
FiveM Protection Setup
PlaySafe FiveM protection works in proxy mode. Your FiveM server stays where it is, at any host. Players connect to a PlaySafe address, PlaySafe filters the traffic at its location in France, and only clean traffic reaches your server.
This guide takes you from choosing a plan to a protected server with direct access closed. It takes about 15 minutes plus one server restart.
Before you start you need:
- A FiveM server that is running and reachable on a public IPv4 address
- Access to its
server.cfgand to the firewall in front of it (your host’s panel, Windows Firewall orufw) - A PlaySafe account with a verified email address
1. Choose a plan or start the free trial
Every plan includes the same protection. Plans differ in the clean traffic included each month and in the support you get:
| Plan | Price per month | Clean traffic per month | Recommended for | Support |
|---|---|---|---|---|
| Starter | 35 EUR | 5 TB | up to 64 players | Tickets |
| Standard | 65 EUR | 10 TB | up to 128 players | Tickets |
| Pro | 110 EUR | 20 TB | up to 256 players | Priority Discord |
| Business | 190 EUR | 40 TB | up to 512 players | Priority Discord and installation help |
| Enterprise | 300 EUR | Unlimited | 1,000+ players | Priority Discord and installation help |
The player numbers are only a recommendation. PlaySafe never counts or limits players. If you go over the clean traffic of your plan, nothing is cut and nothing extra is charged: you get a notice suggesting the next plan.
The 3-day free trial
You can try the protection for 3 days before paying:
- Request the trial from the panel. You pick a plan and fill in the same server details as a paid deploy (step 2 below).
- The request opens a support ticket. A member of the PlaySafe team reviews it there.
- Once approved, the protection is deployed and the ticket gets a reply with your connect address and the steps to finish the setup.
- After 3 days the trial is switched off. Each account can use the trial once.
If you buy a plan during the trial, the paid protection replaces the trial right away and keeps the same connect address, so you do not change anything in server.cfg or in your firewall.
2. Deploy the protection
- In the sidebar, open Security > Game protection > Deploy new.
- Choose FiveM, then click the plan you want.
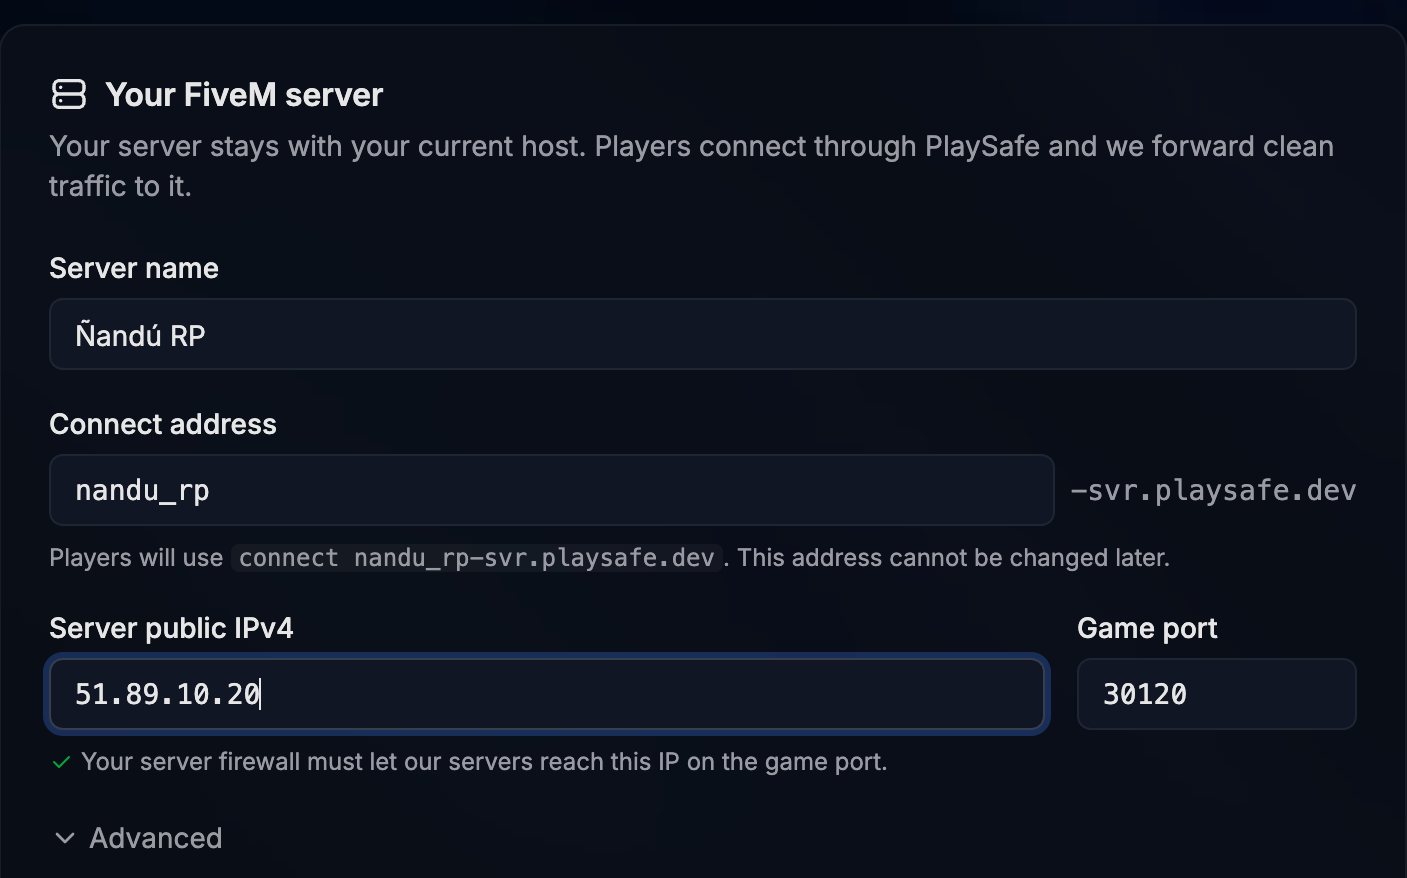
- Fill in the Your FiveM server card:
| Field | What to enter |
|---|---|
| Server name | Any name you like. Only you see it in the panel. |
| Connect address | Filled in from the server name. Lowercase letters, numbers and underscores, up to 15 characters, starting with a letter. It becomes your_address-svr.playsafe.dev. It cannot be changed later. |
| Server public IPv4 | The public IPv4 address of your FiveM server. Hostnames, private addresses and IPv6 are not accepted. |
| Game port | The port your server listens on. The default is 30120. |
- Open Advanced only if you need it:
- HTTP port: the port of your server’s HTTP endpoint, if it is not the game port.
- cfx.re join link: your
cfx.re/join/...link, so the panel can confirm when the server moved to PlaySafe.
- Check the Location: traffic is filtered in France, wherever your server is hosted.
- Click Go to checkout and pay the order.
Do not block PlaySafe
After the payment the protection is deployed automatically. It shows up under Security > Game protection and becomes Active when it is ready.
3. Allow PlaySafe in your server’s firewall
Open the protection (Security > Game protection > your protection). On the Overview tab, the Installation Guide walks you through the same five steps as the rest of this guide. Its step 1, Allow PlaySafe in your server firewall, shows the PlaySafe IP your server receives traffic from.
In the firewall in front of your FiveM server, allow that IP on the game port (TCP and UDP) and on the HTTP port if you use one. Leave everything else as it is for now: players still reach the server directly until step 6.
4. Update server.cfg
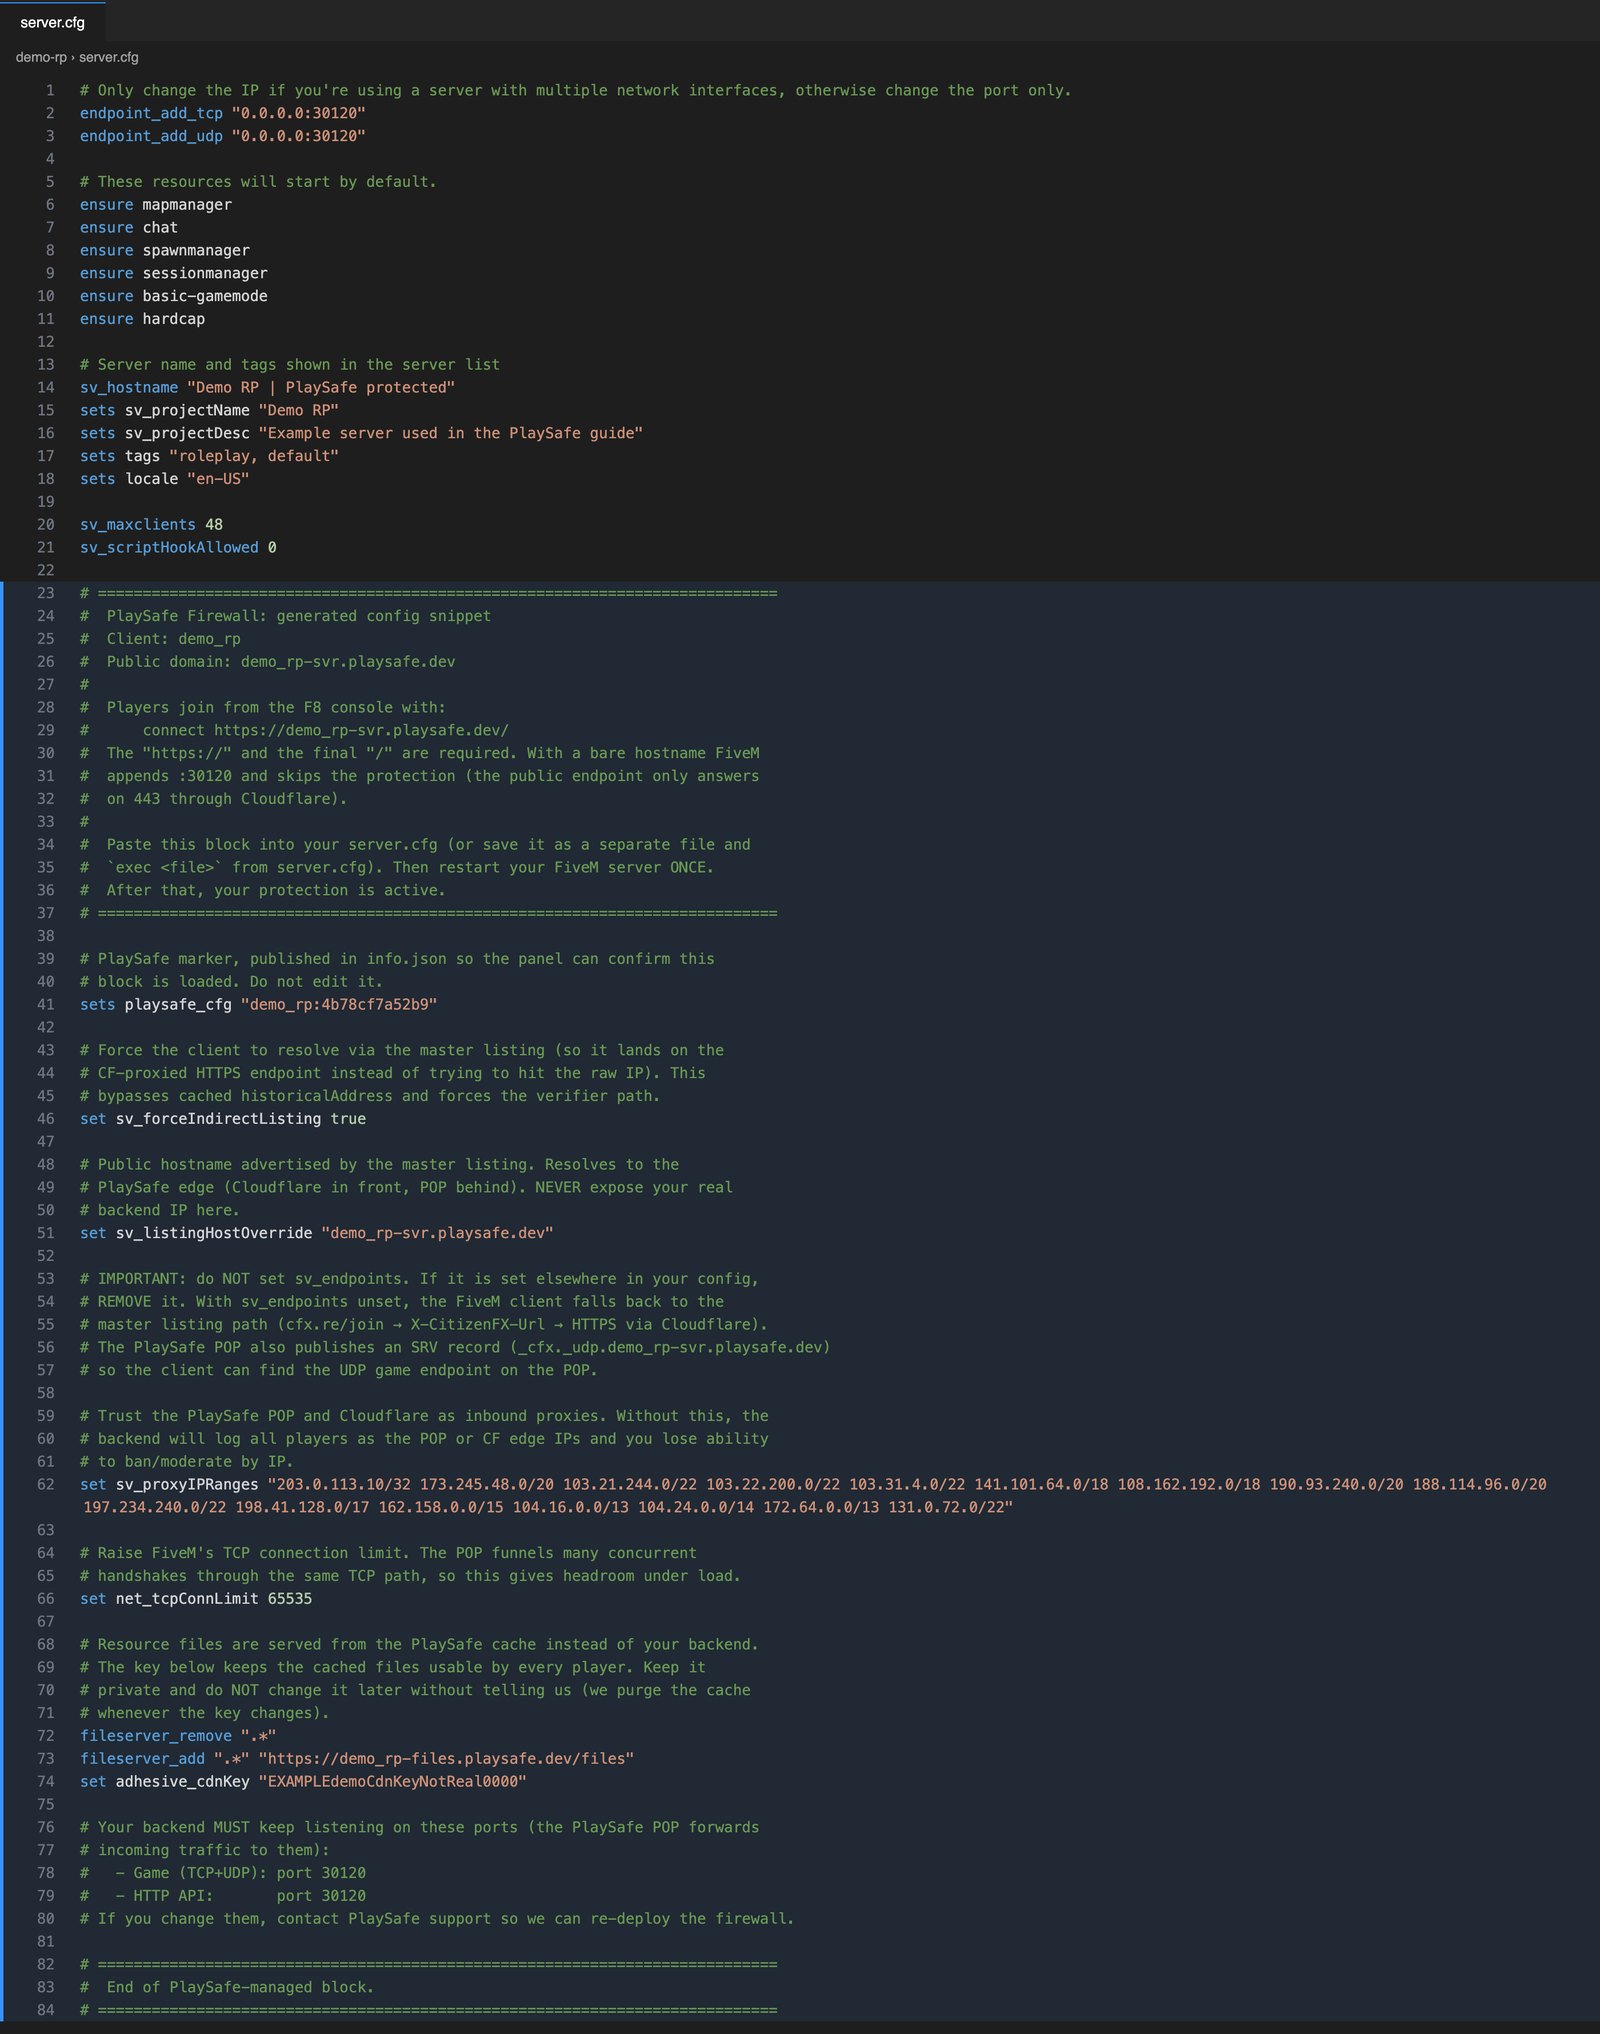
- In the Installation Guide, step 2 Update your FiveM server.cfg, click the copy button. The block is hidden on screen because it contains your server IP; the eye icon shows it after a warning.
- Open your
server.cfgand paste the block. - Remove any
sv_endpointsline you already had. With PlaySafe in front, the server must not announce its own address. - Keep your
endpoint_add_tcpandendpoint_add_udplines: the server still listens on its game port, and PlaySafe forwards players to it. - Restart the FiveM server once, fully (not just a resource restart).
What the block does:
| Line | Why |
|---|---|
sets playsafe_cfg | A marker that lets the panel confirm your server loaded the block. Paste it as it is. |
sv_forceIndirectListing true | Stops the server list from advertising your real IP |
sv_listingHostOverride "your_address-svr.playsafe.dev" | Lists the server under your PlaySafe connect address |
sv_proxyIPRanges | Trusts the PlaySafe addresses, so your server sees the real IP of each player |
set net_tcpConnLimit | Raises the connection limit, since every player now arrives through PlaySafe |
fileserver_remove, fileserver_add and set adhesive_cdnKey | Players download your resources from the PlaySafe cache instead of from your server. PlaySafe generates the key for your protection and it comes in the block, so you do not need your own. |
Paste the block exactly as the panel shows it, comments included: it is generated for your protection, key included. Keep that key private and do not change it without telling PlaySafe, because the cache is purged whenever it changes. You can also save it as a separate file and load it from server.cfg with exec. Its last lines list the ports your server must keep listening on; if you ever change them, open a ticket so PlaySafe updates the protection.
Do not stream your config
5. Give players the new address
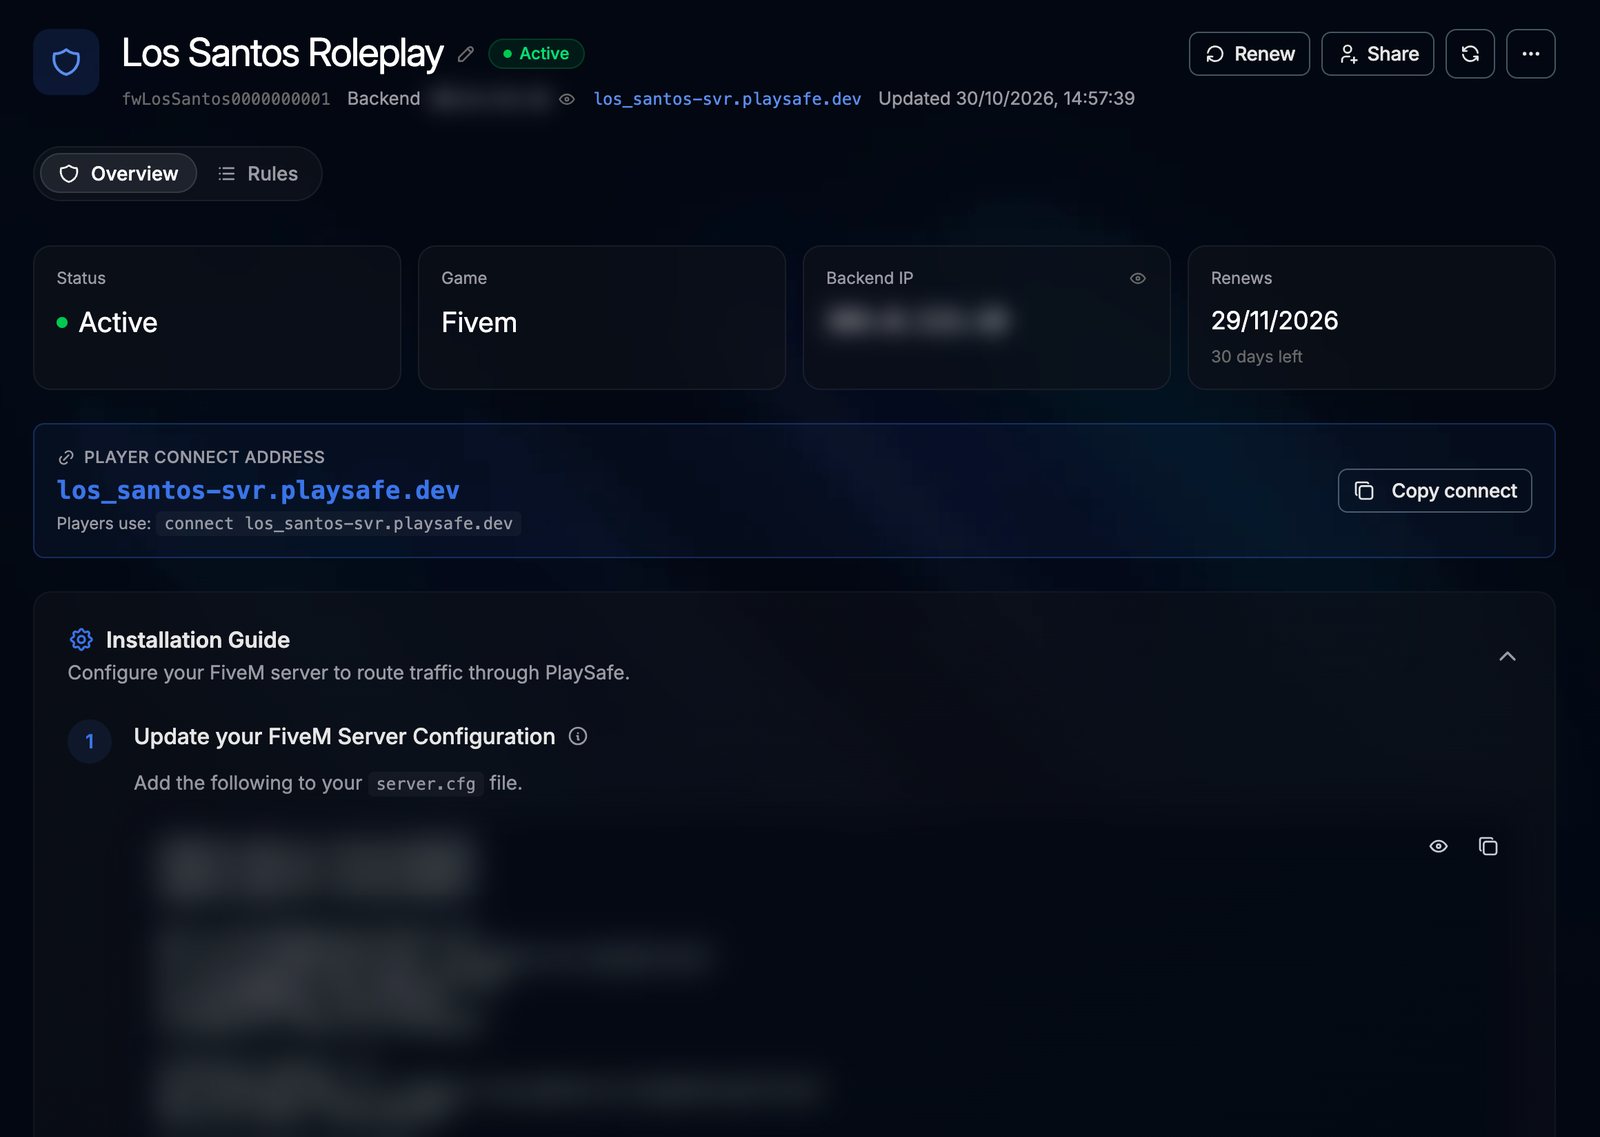
The Player connect address box on the Overview tab and step 3 of the Installation Guide, Give players the new address, show the address. Players join with this command:
connect https://your_address-svr.playsafe.dev/Type it exactly like that in the F8 console, with https:// and the slash at the end. Without https:// the game connects to the server on its own and skips the protection.
Replace the old IP everywhere you shared it: Discord announcements, your website and server list pages. Ask players to remove the old entry from their favourites.
6. Close direct access
This is step 4 of the Installation Guide, Close your server to everyone else. Once players are connecting through the new address, close the door behind them. In the firewall in front of your FiveM server, allow the game port and the HTTP port only from the PlaySafe IP of step 3, and block them for everyone else.
From then on an attacker who knows your old IP cannot reach the game port directly.
txAdmin is not relayed by PlaySafe. It stays on your own server: reach it at your server’s IP and keep its port (40120 by default) open only to your own admin IPs.
Moving a server players already know
If your server was already open before you added PlaySafe, the FiveM client of every player who joined it before remembers its old direct address and tries that address first. Once you close direct access (step 6), those players can get this error when they connect:
Error: Obtaining configuration... CURL error code 28New players are not affected. Error 28 is a general timeout, so if it also happens to players who never joined your server before, open a ticket.
What you do as the server owner
Before closing direct access, announce the change with the new address (
connect https://your_address-svr.playsafe.dev/) or yourcfx.re/joinlink, and close it only after most players have reconnected once.Renew your server’s license key so cached entries stop pointing at the old address:
- Sign in to Keymaster with the account that owns the server.
- Create a new server key for your server.
- Put it in
sv_licenseKeyin yourserver.cfg, replacing the old one. - Restart the server once.
Your server gets a new
cfx.re/joinlink, and old links stop working. Share the new one on Discord and your website.
What affected players can do
Any of these fixes it for a player:
- Connect once with
connect https://your_address-svr.playsafe.dev/in the F8 console. - Connect once with your new
cfx.re/joinlink. - Close FiveM, delete
%AppData%\CitizenFX\data\server-historyand open FiveM again.
After connecting once through the new address, the player’s FiveM remembers it and the error does not come back.
How to check it worked
- A player who had the error connects without it.
https://your_address-svr.playsafe.dev/info.jsonopens in a browser.- The server list shows your server again, which can take 5 to 30 minutes after the restart.
After the setup
Rules
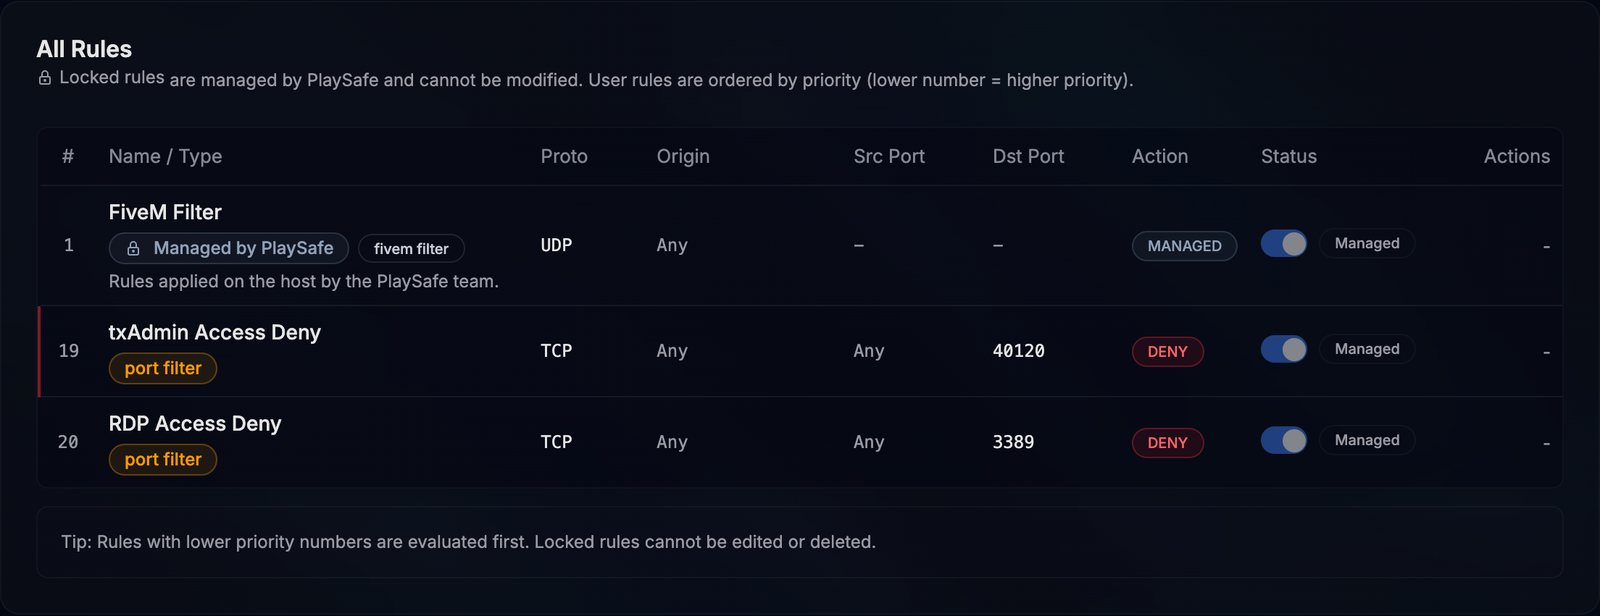
The Rules tab shows the rules PlaySafe manages for you: the FiveM Filter, and the txAdmin port 40120 and Remote Desktop port 3389 closed by default. They are locked. To give your team access to txAdmin or Remote Desktop, follow step 5 of the Installation Guide, Access for your team, or open a ticket from Tickets.
Attacks and reports
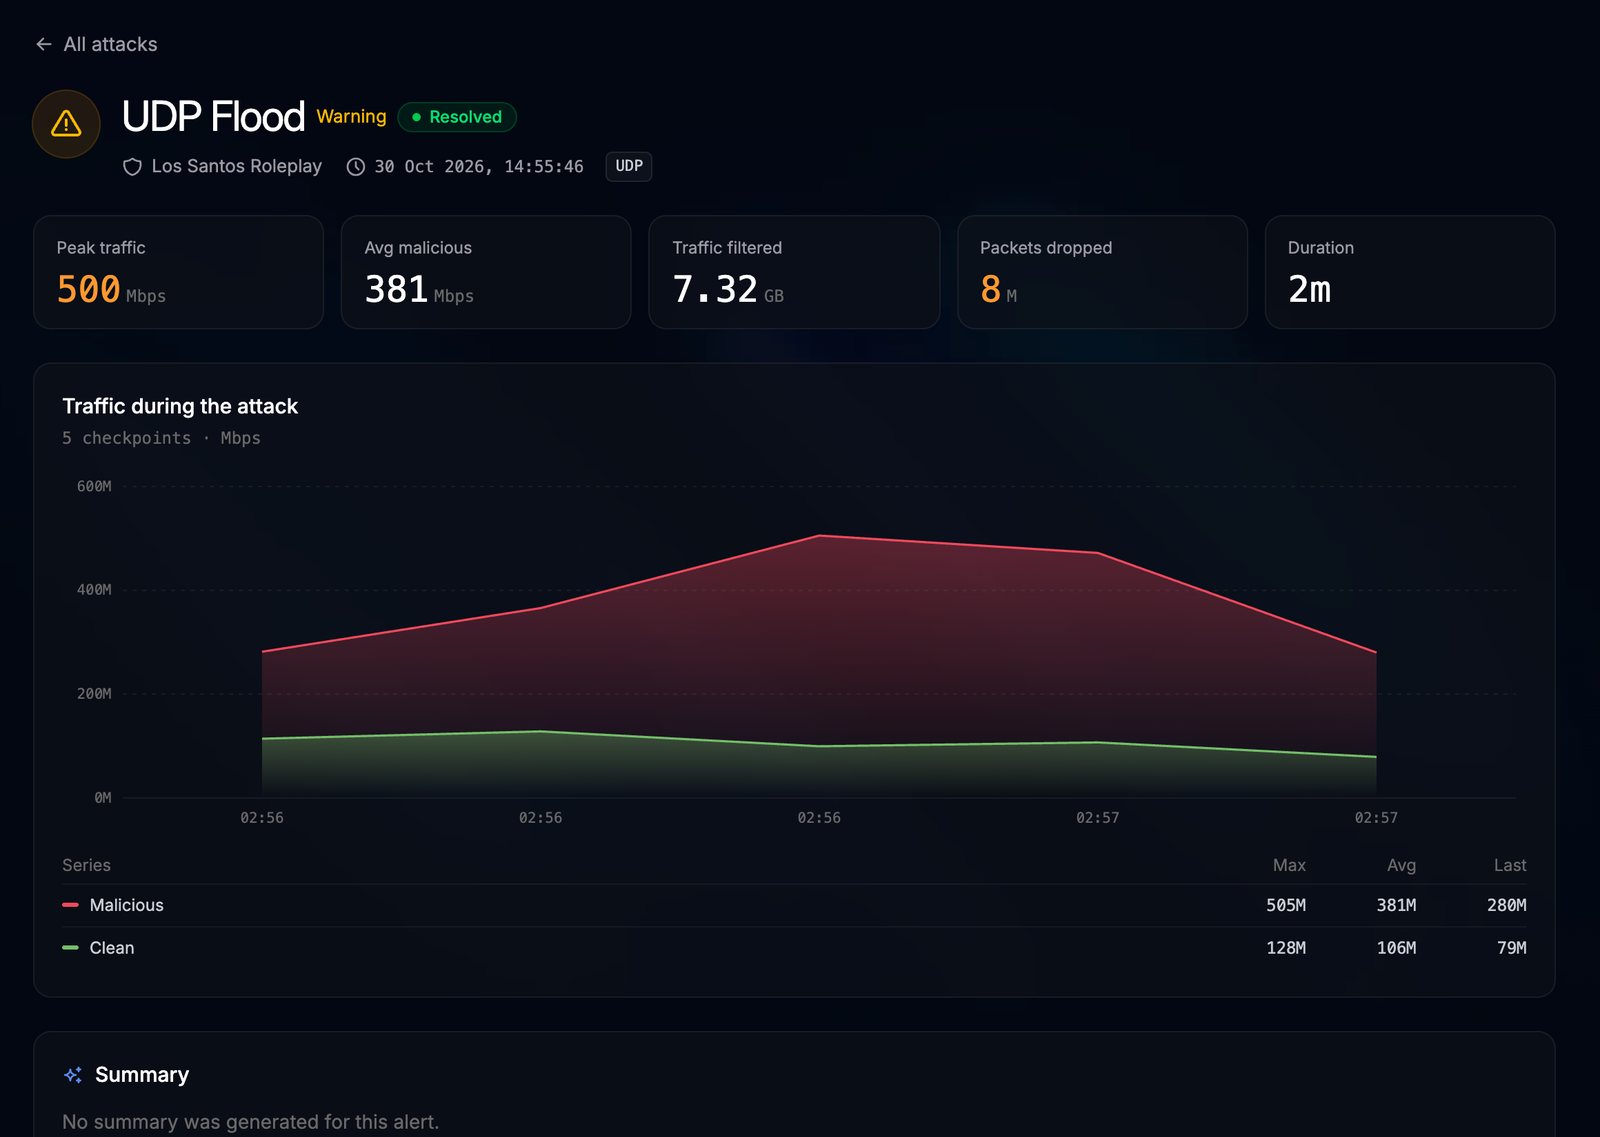
Every attack on your protection appears in Security > Attacks, with its traffic, the vectors and the origins. When it ends you can download a PDF report, and you can get a message by email or Discord when an attack starts and ends.
Troubleshooting
| Symptom | Likely cause |
|---|---|
| The connect address does not answer | The protection is not Active yet, or your firewall blocks the PlaySafe IP |
| The server is listed but players cannot join | The server.cfg block is missing, an old sv_endpoints line is still there, or the server was not restarted |
| Players all show the same IP | sv_proxyIPRanges is missing from server.cfg |
| Players reach the server with the old IP | Step 6 is not done: the game port is still open to everyone |
| Staff cannot open txAdmin | Use your server’s own IP, and allow your admin IPs on its port |
Players who joined before see CURL error code 28 | Their FiveM tries your old address: see Moving a server players already know above |
If you are stuck, open a ticket from Tickets with your connect address.